跳转至

2024年11月

ObjectARX.net学习(2)-CLR 托管C++ 类库

正常cpp项目

类代码如下所示:

C++
#pragma once
#ifndef LX_DLL_CLASS_EXPORTS
#define LX_DLL_CLASS __declspec(dllexport)
#else
#define LX_DLL_CLASS __declspec(dllimport)
#endif
#include <afx.h>
class LX_DLL_CLASS CSelCircleInfo
{
public:
    CSelCircleInfo();
    ~CSelCircleInfo();
    CString sel();
    void test();
};
  • 类库需要导出
  • CString需要引入头文件

正常的clr项目

创建clr类库项目

加载cpp的头文件和库文件

设置信息

image-20240425105414082

  • 注意.net版本
  • 由于cpp项目是MFC的dll,这里需要使用在共享DLL中使用MFC

代码如下所示:

C#
#pragma once
#include "CSelCircleInfo.h"

using namespace System;
namespace ClassLibrary1 {
    public ref class MgCSelCircleInfo
    {
    public:
        MgCSelCircleInfo() : nativeCSelCircleInfo(new CSelCircleInfo()) {}
        ~MgCSelCircleInfo() { this->!MgCSelCircleInfo(); }
        !MgCSelCircleInfo() { delete nativeCSelCircleInfo; }

        System::String^ Sel()
        {
            CString str = nativeCSelCircleInfo->sel();
            return gcnew System::String(str.GetString());
            /*std::string str = nativeCSelCircleInfo->sel();
            String^ managedString = gcnew String(str.c_str());
            return managedString;*/
        }

        void Test()
        {
            nativeCSelCircleInfo->test();
        }

    private:
        CSelCircleInfo* nativeCSelCircleInfo; // 原生CSelCircleInfo类的实例指针
    };
}

正常的.net项目

引入clr创建的dll

代码中使用

  • 先using导入类库
C#
ClassLibrary1.MgCSelCircleInfo mgCSelCircleInfo = new MgCSelCircleInfo();
            string strResult = mgCSelCircleInfo.Sel();

ObjectARX.net学习(1)

先下载工具

https://spiderinnet1.typepad.com/

下载ANAW2017

用向导创建项目

创建简单demo

C#
#region Namespaces

using System;
using System.Text;
using System.Linq;
using System.Xml;
using System.Reflection;
using System.ComponentModel;
using System.Collections;
using System.Collections.Generic;
using System.Diagnostics;
using System.Windows;
using System.Windows.Media.Imaging;
using System.Windows.Forms;
using System.Drawing;
using System.IO;

using Autodesk.AutoCAD.ApplicationServices;
using Autodesk.AutoCAD.DatabaseServices;
using Autodesk.AutoCAD.Runtime;
using Autodesk.AutoCAD.EditorInput;
using Autodesk.AutoCAD.Geometry;
using Autodesk.AutoCAD.Windows;

using Autodesk.AutoCAD.GraphicsSystem;
using Autodesk.AutoCAD.GraphicsInterface;

using MgdAcApplication = Autodesk.AutoCAD.ApplicationServices.Application;
using MgdAcDocument = Autodesk.AutoCAD.ApplicationServices.Document;
using AcWindowsNS = Autodesk.AutoCAD.Windows;

#endregion


namespace AcadNetAddinCS1
{
    public class CmdGroup1
    {
        [CommandMethod("CmdGroup1", "Command1", null, CommandFlags.Modal, null, "AcadNetAddinCS1", "Command1")]
        public void Command1_Method()
        {
            Database db = HostApplicationServices.WorkingDatabase;
            Editor ed = MgdAcApplication.DocumentManager.MdiActiveDocument.Editor;

            try
            {
                using (Transaction tr = db.TransactionManager.StartTransaction())
                {
                    //TODO: add your code below.    
                    Debug.WriteLine("Command1 ran.");
                    ed.WriteMessage("Command1 ran.\n");    


                    tr.Commit();
                }
            }
            catch (System.Exception ex)
            {
                Debug.WriteLine(ex.ToString());
                ed.WriteMessage(ex.ToString());
            }
        }
        [CommandMethod("drawLine")]
        public void Command1_drawLine()
        {
            Database db = HostApplicationServices.WorkingDatabase;
            Point3d startPt = new Point3d(0, 100, 0);
            Point3d endPt = new Point3d(100, 100, 0);
            Line line = new Line(startPt, endPt);
            using (Transaction trans = db.TransactionManager.StartTransaction())
            {
                try
                {
                    BlockTable bt = (BlockTable)trans.GetObject(db.BlockTableId, OpenMode.ForRead);
                    BlockTableRecord btr = (BlockTableRecord)trans.GetObject(bt[BlockTableRecord.ModelSpace], OpenMode.ForWrite);
                    btr.AppendEntity(line);
                    trans.AddNewlyCreatedDBObject(line, true);
                    trans.Commit();
                }
                catch (System.Exception ex)
                {
                    trans.Abort();
                }
            }
        }

    }
}

ObjectARX各版本免费下载

https://blog.csdn.net/lhxy24/article/details/101058720

ObjectARX 2020 Wizard

AutoCAD 2020 DotNet Wizard

ObjectARX2020 bug修改

1、C:\Program Files (x86)\Autodesk\ObjectARX 2020 Wizards\ArxAppWiz\Scripts\1033\default.js

从C:\Program Files (x86)\Autodesk\ObjectARX 2020 Wizards\ArxAppWiz\Templates\1033为新建项目的模板,拷贝这里面的文件,x64win32.vcxproj设置,要改变

Bash
1
2
3
4
5
6
7
<PropertyGroup Label="Globals">
    <ArxAppType>[!output PRJ_TYPE_APP]</ArxAppType>
    <RDS>[!output RDS_SYMB]</RDS>
    <TargetName Condition="'$(RDS)'!=''">$(RDS)$(ProjectName)</TargetName>
    <ProjectGuid>{F87873B0-2B5D-4D52-8FD5-BE1CDC50B2E3}</ProjectGuid>
    <WindowsTargetPlatformVersion>10.0.16299.0</WindowsTargetPlatformVersion>
  </PropertyGroup>

后面PropertyGroup 标签中的WindowsTargetPlatformVersion要考到前面来,否则找不到系统库。目标平台会被默认为win8.1,无法按win10SDK版本号导入目录。

2、C:\Program Files (x86)\Autodesk\ObjectARX 2020 Wizards\文件夹内外都有属性页设置,到底用的哪个还没整清楚。 应该是拷贝目录外面的,

Bash
1
2
3
CopyPropsFile ( 'Autodesk.arx-2020.props', strProjectName) ;
CopyPropsFile ( 'Autodesk.arx-2020-net.props', strProjectName) ;
CopyPropsFile ( 'crx.props', strProjectName) ;

因为crx.props在外面。

3、接2中,无论拷贝哪个属性页,目前是在项目中的vcxproj文件中,

合并上面这两个文件,之后 Autodesk.arx-2020.props文件会在合并下面6个文件 前三个

Bash
1
2
3
<Import Condition="'$(ArxAppType)'=='dbx' or '$(ArxAppType)'=='dbxnet'" Project="$(ArxSdkDir)\inc\dbx.props" />
<Import Condition="'$(ArxAppType)'=='crx' or '$(ArxAppType)'=='crxnet'" Project="$(ArxSdkDir)\inc\crx.props" />
<Import Condition="'$(ArxAppType)'=='arx' or '$(ArxAppType)'=='arxnet'" Project="$(ArxSdkDir)\inc\arx.props" />

后3个文件主要是不同项目类型的引用库的文件。

Bash
1
2
3
<Import Condition="'$(Configuration)'=='Release'" Project="$(ArxSdkDir)\inc\rxsdk_Releasecfg.props" />
<Import Condition="'$(Configuration)'=='Debug'" Project="$(ArxSdkDir)\inc\rxsdk_Debugcfg.props" />
<Import Condition="'$(ArxAppType)'=='dbxnet' or '$(ArxAppType)'=='crxnet' or '$(ArxAppType)'=='arxnet'" Project="Autodesk.arx-2020-net.props" />

这三个是调试和最终发布的一些设置,其中出bug那个地方是在true改为false。 原文链接:https://blog.csdn.net/ImummyI/article/details/103980572

clr操作cpp最简单的方式

创建cpp代码

导出需要使用的代码

在cpp中先封装一次

CFuncHelper.h

C++
#pragma once
#ifdef ZWWHFORJTSERIALNOLABEL_MODULE
#define DLLIMPEXP __declspec(dllexport)
#else
#define DLLIMPEXP
#endif
class DLLIMPEXP CFuncHelper
{
public:
    CFuncHelper();
    ~CFuncHelper();

    bool generateNo();
};

CFuncHelper.cpp

C++
#include "stdafx.h"
#include "CFuncHelper.h"
#include "CGenerateSerialNo.h"
#include "CGlobalHelper.h"
#include "CSelCSerialNo.h"
#include "CCoordinateInfoJig.h"


CFuncHelper::CFuncHelper()
{
}


CFuncHelper::~CFuncHelper()
{
}

bool CFuncHelper::generateNo()
{
    CGenerateSerialNo gen;
    if (!gen.doIt())
    {
        return false;
    }
    gen.drawSerialNoByInfo();
    AcGePoint3d basePt = gen.basePt();

    AcDbExtents exts = CGlobalHelper::getFrameExtsbyPoint(basePt);
    CGlobalHelper::ZOOMWINDOW(exts.minPoint(), exts.maxPoint());
    AcGePoint3d minPt, maxPt;
    minPt = CGlobalHelper::TransformPoint(exts.minPoint(), 0, 1);
    maxPt = CGlobalHelper::TransformPoint(exts.maxPoint(), 0, 1);
    exts.set(minPt, maxPt);
    CSelCSerialNo sel;
    sel.setExtents(exts);
    resbuf *rb = acutBuildList(
        -4, _T("<and"), RTDXF0, CBaseConstant::SERIAL_NO, -4, _T("and>"),
        RTNONE); // Simplification for apparent list
    if (!sel.selEnt(rb))
    {
        return false;
    }

    vector<CDimInfo> vecInfo = sel.data();
    if (vecInfo.size() < 1)
    {
        return false;
    }

    CCoordinateInfoJig *jig = new CCoordinateInfoJig();
    jig->startJig(vecInfo);
    return true;
}

创建Clr代码

image-20241202083011439

clrDemo.h

C++
#pragma once
#include "CFuncHelper.h"
using namespace System;

namespace clrDemo {
    public ref class ManageExport
    {
    public:
        ManageExport() : nativeCSelCircleInfo(new CFuncHelper()) {}
        ~ManageExport() { this->!ManageExport(); }
        !ManageExport() { delete nativeCSelCircleInfo; }
        bool Test()
        {
            return nativeCSelCircleInfo->generateNo();
        }

    private:
        CFuncHelper* nativeCSelCircleInfo; // 原生CSelCircleInfo类的实例指针

    };
}

Csharp中引入clr生成的dll

Sublime Text4 4169 安装激活

下载地址

https://download.sublimetext.com/sublime_text_build_4169_x64_setup.exe

激活

默认安装路径:C:\Program Files\Sublime Text

安装之后,使用sublime text 打开安装目录下的sublime_text.exe文件。

Ctrl + F 搜到到

Bash
80 7805 000f
94c1

更改为

Bash
c6 4005 0148
85c9

然后另存到其他路径,然后关闭sublime text,将原sublime_text.exe进行替换即可。

关闭更新

打开Sublime,在最上方菜单栏点击Preferences(中文“首选项”),然后点击(中文“设置-特定语法”)

在花括号中输入以下语句: "ignored_packages": [], "update_check":false, 然后,Ctrl+S保存 注:切记是在英文模式下!!!

image-20240719162525183

打开Sublime,在最上方菜单栏点击Preferences(中文“首选项”),然后点击Settings(中文“设置”)

在花括号中输入以下语句: "update_check":false, 注:切记是在英文模式下!!!

image-20240719162626571

☞ How to install free evaluation for Sublime Text:

Bash
1. Package Control  Install Package  Theme - Monokai Pro
2. Command Palette  Monokai Pro: select theme

ConvertToUTF8

Bash
Package Control  Install Package  ConvertToUTF8

BracketHighlighter

Bash
Package Control  Install Package  BracketHighlighter

Chinese

Bash
Package Control  Install Package  Chinese

使用 XAML 格式化工具:XAML Styler

1. XAML 的问题#

刚入门 WPF/UWP 之类的 XAML 平台,首先会接触到 XAML 这一新事物。初学 XAML 时对它的印象可以归纳为一个词:一坨

随着我在 XAML 平台上工作的时间越来越长,我对 XAML 的了解就越来越深入,从语法、约束、扩展性等方方面面,我明白到 XAML 是桌面开发平台的一个最佳解决方案。这时候我已经对 XAML 有了改观,我重新用一个词归纳了我对它的印象:一大坨

没错,这时候我已经是一个成熟的 XAML 工人了,经过我熟练的双手产生了一坨又一坨 XAML,它们成长相遇结合繁衍,变成了一大坨又一大坨 XAML。

明明 XAML 这么一大坨已经够艰难了,偏偏对于它的格式化微软爸爸也没给个好的方案。对我来说,XAML 格式化主要的难题是下面几个:

  • 如果所有属性都写在同一行,它太宽了很难看到后面的属性
  • 如果每个属性单独一行,它又太长了很难看清楚它的结构
  • 属性之间没有排序,重要属性的属性找起来很困难
  • 团队没有统一的标准,不小心格式化一下代码的话全部都会变,CodeReview 烦死个人

如果不想得过且过忍受上述这些问题的话,可以试试用 XAML Styler 这个工具,它正好解决了我最想解决的问题。

2. 安装 XAML Styler#

XAML Styler 是一个 VisualStudio插件(也可用于其它 IDE),这是它在 Github 上的地址:

https://github.com/Xavalon/XamlStyler

在这里你可以找到具体的文档,而这篇文章我只介绍我关心的其中几个属性,不一定满足到你。

在 VisualStudio 的管理扩展窗口中,输入 XamlStyle 搜索,点击“下载”然后关闭 VisualStudio 即可完成安装。

img

安装完成后重启 Visual Studio,可以在“选项”窗口中看到它的配置:

img

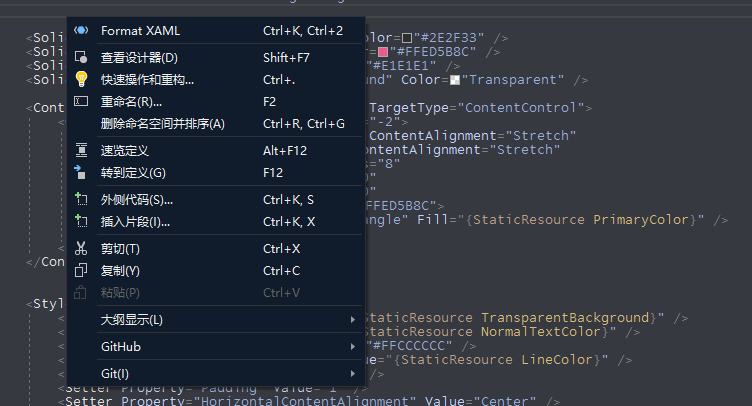
之后,每次在 XAML 编辑器中执行保存都会自动进行格式化操作。你也可以在 XAML 编辑器的右键菜单选择 Format XAML 或使用快捷键进行格式化。

img

3. 格式化#

XAML 的格式主要有两种方式:所有属性放一行和每个属性单独一行。

如果选择所有属性放一行的时候,XAML 结构清晰,结构严谨,段落分明,而且文件也很短。

可是万一很多属性问题就出来了,一行 XAML 会变得很长。而且看看下面两个 ContentPresenter,同样都有 Margin 属性、HorizontalAlignment 属性,VerticalAlignment 属性,RecognizesAccessKey 属性,SnapsToDevicePixels 顺序ing,但你能看到第二个 ContentPresenter 后面偷偷塞了个 Margin 吗:

XML
Copy<ContentPresenter Margin="{TemplateBinding Padding}" HorizontalAlignment="{TemplateBinding HorizontalContentAlignment}" VerticalAlignment="{TemplateBinding VerticalContentAlignment}" RecognizesAccessKey="True" SnapsToDevicePixels="{TemplateBinding SnapsToDevicePixels}"/>
<ContentPresenter Margin="{TemplateBinding Padding}" HorizontalAlignment="{TemplateBinding HorizontalContentAlignment}" VerticalAlignment="{TemplateBinding VerticalContentAlignment}" RecognizesAccessKey="True" SnapsToDevicePixels="{TemplateBinding SnapsToDevicePixels}" Margin="40"/>

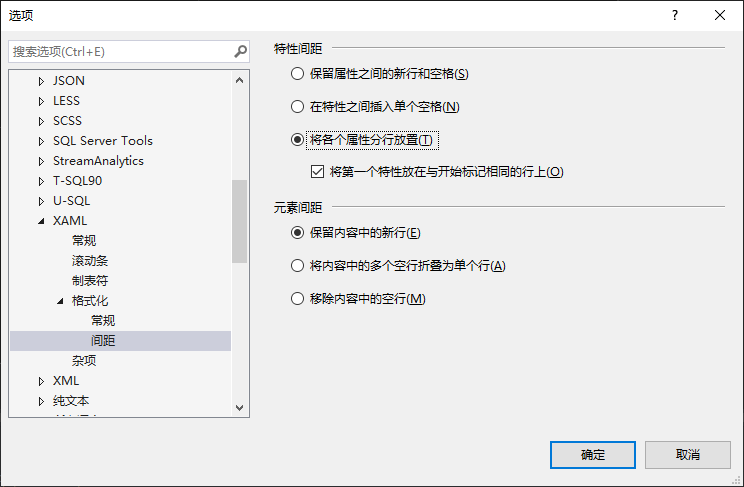
如果在 VisualStudio 中“文本编辑器->XAML->格式化->间距->特性间距”这个选项中选择了“将各个属性分别放置”:

img

格式化文档后上面的 XAML 就会变成这样:

XML
Copy<ContentPresenter Margin="{TemplateBinding Padding}"
                  HorizontalAlignment="{TemplateBinding HorizontalContentAlignment}"
                  VerticalAlignment="{TemplateBinding VerticalContentAlignment}"
                  RecognizesAccessKey="True"
                  SnapsToDevicePixels="{TemplateBinding SnapsToDevicePixels}" />
<ContentPresenter Margin="{TemplateBinding Padding}"
                  HorizontalAlignment="{TemplateBinding HorizontalContentAlignment}"
                  VerticalAlignment="{TemplateBinding VerticalContentAlignment}"
                  RecognizesAccessKey="True"
                  SnapsToDevicePixels="{TemplateBinding SnapsToDevicePixels}"
                  Margin="40" />

每个属性单独一行不仅不会看漏属性,而且编辑器本身也不会有横向和纵向两种方向的移动,只有从上到下的移动,这就舒服多了。

可是大部分情况下每个属性分行放置会破坏原本清晰的 XAML 层次结构,例如下面这种本来好好的 XAML:

XML
1
2
3
4
5
6
Copy<Setter Property="FontWeight" Value="Normal" />
<Setter Property="UseSystemFocusVisuals" Value="True" />
<Setter Property="FocusVisualMargin" Value="-3" />
<Setter Property="Height" Value="50" />
<Setter Property="Width" Value="50" />
<Setter Property="Maximum" Value="1" />

变成这样:

XML
Copy<Setter Property="FontWeight"
        Value="Normal" />
<Setter Property="UseSystemFocusVisuals"
        Value="True" />
<Setter Property="FocusVisualMargin"
        Value="-3" />
<Setter Property="Height"
        Value="50" />
<Setter Property="Width"
        Value="50" />
<Setter Property="Maximum"
        Value="1" />

这种风格优雅得像诗歌 我偶尔称为豆瓣风 一行变两行 两行变四行 本来 一页看得完 的代码 变成 两页才看得完 也是够 麻烦的。

XAML Styler 很好地解决了这个问题,它通过 “Attribute tolerance” 属性控制每一行的容许的最多的属性数量,如果一个元素的属性数量少于设定值,那就放在一行,如果超过就所有属性单独一行。通常我将这个属性设置为 2,再配合 “Keep first attribute on same line = true” 的设置,可以做到下面这种格式化效果:

XML
Copy<SolidColorBrush x:Key="NormalTextColor" Color="#2E2F33" />
<SolidColorBrush x:Key="PrimaryColor" Color="#FFED5B8C" />
<SolidColorBrush x:Key="LineColor" Color="#E1E1E1" />
<SolidColorBrush x:Key="TransparentBackground" Color="Transparent" />

<ControlTemplate x:Key="CompletedTemplate" TargetType="ContentControl">
    <Grid x:Name="CompletedElement" Margin="-2">
        <control:DropShadowPanel HorizontalContentAlignment="Stretch"
                                 VerticalContentAlignment="Stretch"
                                 BlurRadius="8"
                                 OffsetX="0"
                                 OffsetY="0"
                                 Color="#FFED5B8C">
            <Ellipse x:Name="CompletedRectangle" Fill="{StaticResource PrimaryColor}" />
        </control:DropShadowPanel>
    </Grid>
</ControlTemplate>

这样就可以兼顾两种格式化的优点。

4. 排序#

如果元素有多个属性,要找到它的主要属性(通常是 Name 和 Grid.Row)需要颇费一番功夫。XAML Styler 根据一个可设定的规则自动将元素的各个属性排序,这个规则如下:

JSON
Copy"AttributeOrderingRuleGroups": [
    "x:Class",
    "xmlns, xmlns:x",
    "xmlns:*",
    "x:Key, Key, x:Name, Name, x:Uid, Uid, Title",
    "Grid.Row, Grid.RowSpan, Grid.Column, Grid.ColumnSpan, Canvas.Left, Canvas.Top, Canvas.Right, Canvas.Bottom",
    "Width, Height, MinWidth, MinHeight, MaxWidth, MaxHeight",
    "Margin, Padding, HorizontalAlignment, VerticalAlignment, HorizontalContentAlignment, VerticalContentAlignment, Panel.ZIndex",
    "*:*, *",
    "PageSource, PageIndex, Offset, Color, TargetName, Property, Value, StartPoint, EndPoint",
    "mc:Ignorable, d:IsDataSource, d:LayoutOverrides, d:IsStaticText",
    "Storyboard.*, From, To, Duration"
],

排序结果大致如下:

XML
1
2
3
4
5
6
7
8
9
Copy<Button x:Name="Show"
        Grid.Row="1"
        Padding="40,20"
        HorizontalAlignment="Center"
        VerticalAlignment="Center"
        Background="#00aef1"
        Content="Show"
        Foreground="White"
        Style="{StaticResource BubbleButtonStyle}" />

另外,我不喜欢它自动将 VisualStateManager 排序到后面,虽然这个排序合理,但不符合我的习惯,所以要将 “Record visual state manager” 设置为 None。

5. 统一标准#

最后,就算自己做好了格式化,团队中的其它成员使用了不同的格式化标准也会引起很多问题。针对这个问题 Xaml Styler 也提供了解决方案。

在项目的根目录创建一个名为“Settings.XamlStyler”的文件,内容参考这个网址:https://github.com/Xavalon/XamlStyler/wiki/External-Configurations 中的 Default Configuration。有了这个配置文件,XAML Styler 就会根据它而不是全局配置进行格式化,作为项目的统一格式化标准。

Csharp使用Newtonsoft.Json生成JSON字符串

下载newtonsoftjson

在“解决方案资源管理器”中,右键单击项目,然后选择“管理NuGet程序包”。在NuGet包管理器中,搜索“Newtonsoft.Json”。找到Newtonsoft.Json包,点击安装按钮

C#
using Newtonsoft.Json;
using Newtonsoft.Json.Linq;

对于复杂json串

  • 对于简单的json的可以直接解析, 复杂的json, 建议用先创建json对应的类,然后再用JsonConvert.DeserializeObject转为类来解析, 当json比较复杂时, 创建类也比较浪费时间, VS2022为C#提供了json转C#类的工具,先复制需要转为类的json字符串,然后将光标定位到cs文件的空白处,最后点击编辑–选择性粘贴–将Json粘贴为类,如下图:

  • 除了VS自带的工具,也有一些网站提供了类似的功能,例如Json2CSharp

### demo

JSON
1
2
3
4
5
6
7
8
9
{
    "items": [{
        "id": "csrf",
        "attributes": {
            "nonce key": "CSRF NONCE",
            "nonce": "i8Ah1n1DHs71704s2oZnSxmiz4/R3T5mbFrkxErz4m8RUDf3kyX+ror25kZ09Env0tGeVBe+iES8/Y04XRfAKvghp1/+ZIx09oVE7GiE"
        }
    }]
}

class

C#
//如果好用,请收藏地址,帮忙分享。
public class Attributes
{
    /// <summary>
    /// 
    /// </summary>
    public string nonce_key { get; set; }
/// <summary>
/// 
/// </summary>
    public string nonce { get; set; }
}

public class ItemsItem
{
    /// <summary>
    /// 
    /// </summary>
    public string id { get; set; }
    /// <summary>
    /// 
    /// </summary>
    public Attributes attributes { get; set; }
}
//Root可以改成自己喜欢的类名
public class CScrfRoot
{
    /// <summary>
    /// 
    /// </summary>
    public List<ItemsItem> items { get; set; }
}

读取json文件

C#
public static string GetDllDirectory()
{
    string codeBase = Assembly.GetExecutingAssembly().CodeBase;
    UriBuilder uri = new UriBuilder(codeBase);
    string path = Uri.UnescapeDataString(uri.Path);
    return System.IO.Path.GetDirectoryName(path);
}
public MyDropMenu()
{
    System.Uri resourceLocater = new System.Uri("/MyDropMenu;component/ComUseicons.xaml", System.UriKind.Relative);
    ResourceDictionary rd = (ResourceDictionary)Application.LoadComponent(resourceLocater);
    Application.Current.Resources.MergedDictionaries.Add(rd);

    InitializeComponent();
    try
    {
        string jsonFile = GetDllDirectory() + "\\Menu.json";
        // 确保文件存在
        if (!File.Exists(jsonFile))
            throw new FileNotFoundException("The JSON file was not found." + jsonFile);

        // 读取文件内容并反序列化为指定的类型 T
        var reader = new StreamReader(jsonFile);
        var json = reader.ReadToEnd();
        var person = JsonConvert.DeserializeObject<Root>(json);
        Items = person.ItemMenu;
        //遍历items,将icon添加数据
        // 遍历并修改Icon
        foreach (var itemMenu in Items)
        {
            itemMenu.Icon = GetDllDirectory() + "\\config\\Images\\PNG\\" + itemMenu.Icon;
            foreach (var subItem in itemMenu.SubItems)
            {
                subItem.Icon = GetDllDirectory() + "\\config\\Images\\PNG\\" + subItem.Icon;
            }
        }
        LeftMenu.ItemsSource = Items;
    }
    catch (Exception)
    {
        throw;
    }
}

获取token(nonce)值

C#
 public static string getTokenFromJson(string strJson)
        {
            string strRet = "";
            //strJson = "{\"items\":[{\"id\":\"csrf\",\"attributes\":{\"nonce key\":\"CSRF NONCE\",\"nonce\":\"i8Ah1n1DHs71704s2oZnSxmiz4/R3T5mbFrkxErz4m8RUDf3kyX+ror25kZ09Env0tGeVBe+iES8/Y04XRfAKvghp1/+ZIx09oVE7GiE\"}}]}";
            var person = JsonConvert.DeserializeObject<CScrfRoot>(strJson);
            List<ItemsItem> listItems = person.items;
            if(listItems.Count >= 1)
            {
                ItemsItem itemsItem = listItems[0];
                Attributes attr = itemsItem.attributes;
                strRet = attr.nonce;
            }

            return strRet;
        }

LINQ to JSON主要使用到JObject, JArray, JProperty和JValue这四个对象

  • JObject用来生成一个JSON对象,简单来说就是生成”{}”,
  • JArray用来生成一个JSON数组,也就是”[]”,
  • JProperty用来生成一个JSON数据,格式为key/value的值,
  • 而JValue则直接生成一个JSON值
C#
//将json转换为JObject
JObject jObj = new JObject();
jObj.Add("process0id", AdditionClass.GetDeFaultProjectNo());


PdfRow pdfRow1 = new PdfRow();
pdfRow1.status = "success";
pdfRow1.pdfname = "D:\\ZWPDF\\PDF\\JG-72-BL-LB1.pdf";


PdfRow pdfRow2 = new PdfRow();
pdfRow2.status = "error";
pdfRow2.pdfname = "D:\\ZWPDF\\PDF\\JG-72-BL-LB2.pdf";


List<PdfRow> videogames = new List<PdfRow>();
videogames.Add(pdfRow1);
videogames.Add(pdfRow2);

JArray jArray = (JArray)JsonConvert.DeserializeObject(JsonConvert.SerializeObject(videogames));
jObj.Add("message", "转换完成");
jObj.Add("rowPdf", jArray);
Console.WriteLine(jObj.ToString());
JSON
{
  "process0id": "05369",
  "message": "转换完成",
  "rowPdf": [
    {
      "status": "error",
      "pdfname": "D:\\TEST\\ZP-35-DYT-35N3--竖向图框.dwg"
    },
    {
      "status": "error",
      "pdfname": "D:\\TEST\\图框外有多余线条.dwg"
    },
    {
      "status": "error",
      "pdfname": "D:\\TEST\\弧线标注的圆心在图框外1.dwg"
    }
  ]
}

ObjectARX加载菜单

使用ObjectARX有几种加载菜单的方式

使用aced函数加载

LocadMenu.h

C++
#pragma once
#include "stdafx.h"

class Menu
{
public:
    Menu();
    ~Menu();
    static bool    IsFileExists(LPCTSTR szPath);
    static CString GetFolder(LPCTSTR szPath);
    static CString GetCurDir();
    static CString FindConPath(CString FileName);
    static void    CLoadMenu(CString sName, CString szPath);
    static void    CUnLoadMenu(CString sName, CString szPath);
    static void    RemoveMenuCache(CString sName, CString szPath);
};

LocadMenu.cpp

C++
#include "stdafx.h"
#include "LoadMenu.h"

Menu::Menu() {}

Menu::~Menu() {}

bool Menu::IsFileExists(LPCTSTR szPath)
{
    CFileStatus st;
    return CFile::GetStatus(szPath, st);
}

CString Menu::GetFolder(LPCTSTR szPath)
{
    CString strPath(szPath);
    strPath.TrimRight(_T("\\/"));

    int pos = strPath.ReverseFind(_T('\\'));
    int pos2 = strPath.ReverseFind(_T('/'));
    pos = max(pos, pos2);

    if (pos < 0)
    {
        return _T("");
    }

    return strPath.Left(pos + 1);
}

CString Menu::GetCurDir()
{
    TCHAR szPath[_MAX_PATH];
    ::GetModuleFileName(_hdllInstance, szPath, _MAX_PATH);

    TCHAR szDrive[_MAX_DRIVE];
    TCHAR szDir[_MAX_DIR];
    TCHAR szFname[_MAX_FNAME];
    TCHAR szExt[_MAX_EXT];
    _tsplitpath_s(szPath, szDrive, szDir, szFname, szExt);

    return CString(szDrive) + szDir;
}

CString Menu::FindConPath(CString FileName)
{
    CString sDir = GetCurDir();

    CString sPath = sDir + FileName;
    while (!IsFileExists(sPath))
    {
        sDir = GetFolder(sDir);
        if (sDir.IsEmpty())
        {
            return _T("");
        }

        sPath = sDir + FileName;
    }
    return sPath;
}

void Menu::CLoadMenu(CString sName, CString szPath)
{
    //加载菜单
    if (!acedIsMenuGroupLoaded(sName))
    {
        CString str;

        str = FindConPath(szPath + _T(".cuix"));
        if (str.IsEmpty())
        {
            str = FindConPath(szPath + _T(".mnu"));
        }

        acedLoadPartialMenu(str);
    }
}

void Menu::CUnLoadMenu(CString sName, CString szPath)
{
    //卸载菜单
    if (acedIsMenuGroupLoaded(sName))
    {
        CString str;

        str = FindConPath(szPath + _T(".cuix"));
        if (str.IsEmpty())
        {
            str = FindConPath(szPath + _T(".mnu"));
        }

        acedUnloadPartialMenu(str);
    }
}

void Menu::RemoveMenuCache(CString sName, CString szPath)
{
    if (acedIsMenuGroupLoaded(sName))
    {
        CString str;

        str = FindConPath(szPath + _T(".cuix"));
        if (str.IsEmpty())
        {
            return;
        }
        int   len = WideCharToMultiByte(CP_ACP, 0, str, -1, NULL, 0, NULL, NULL);
        char* ptxtTemp = new char[len + 1];
        WideCharToMultiByte(CP_ACP, 0, str, -1, ptxtTemp, len, NULL, NULL);
        remove(ptxtTemp);
        delete[] ptxtTemp;
    }
}

使用方式

C++
virtual AcRx::AppRetCode On_kInitAppMsg(void *pkt)
{
    // You *must* call On_kInitAppMsg here
    AcRx::AppRetCode retCode = AcRxArxApp::On_kInitAppMsg(pkt);
    Menu::CUnLoadMenu(_T("SHRoad"), _T("Library\\Menu\\SHGLJTDZKFXM"));
    Menu::CLoadMenu(_T("SHRoad"), _T("Library\\Menu\\SHGLJTDZKFXM"));

    return (retCode);
}

virtual AcRx::AppRetCode On_kUnloadAppMsg(void *pkt)
{
    AcRx::AppRetCode retCode = AcRxArxApp::On_kUnloadAppMsg(pkt);
    Menu::CUnLoadMenu(_T("SHGLJTDZKFXM"), _T("Library\\Menu\\SHGLJTDZKFXM"));
    return (retCode);
}

第二种方式使用com加载

C++
#include "CAcadApplication.h"
#include "CAcadDocument.h"
#include "CAcadMenuBar.h"
#include "CAcadMenuGroup.h"
#include "CAcadMenuGroups.h"
#include "CAcadPopupMenu.h"
#include "CAcadPopupMenus.h"
//加载cui文件
bool LoadPartialMenu(
    const TCHAR* filePath //局部菜单文件名
    ,
    const TCHAR* menuGroupName)

{
    //如果有的话先卸载

    long menuGroupNum; //菜单组数目

    VARIANT index;

    VariantInit(&index);

    index.vt = VT_I4;

    CString strGroupName(menuGroupName);

    CAcadApplication acadApp(acedGetAcadWinApp()->GetIDispatch(TRUE));

    CAcadMenuGroups menuGroups(acadApp.get_MenuGroups());

    CAcadMenuGroup menuGroup;

    menuGroupNum = menuGroups.get_Count();

    for (long i = 0; i < menuGroupNum; i++)
    {
        index.lVal = i;

        menuGroup = menuGroups.Item(index);
        CString strName = menuGroup.get_Name();
        if (strName.CompareNoCase(strGroupName) == 0)
        {
            menuGroup.Unload();

            break;
            //return false;
        }
    }

    //加载菜单

    VARIANT BaseMenu; //是否加载为基础菜单

    VariantInit(&BaseMenu);

    BaseMenu.vt = VT_BOOL;

    BaseMenu.boolVal = FALSE;

    menuGroups.Load(CString(filePath), BaseMenu);
    // 把菜单在菜单条上显示出来

    //CAcadMenuBar menuBar(acadApp.get_MenuBar());  //当前菜单条

    //CAcadPopupMenus popupMenus(menuGroup.get_Menus()); //要加入的菜单条

    //CAcadPopupMenu popupMenu;

    //long curPopupMenuNum = menuBar.get_Count();   //当前菜单条上菜单的数目

    //long n = popupMenus.get_Count();
    ////bool beExit = false;
    //for (long i = 0; i < n; i++) {

    //  index.lVal = i;

    //  popupMenu = popupMenus.Item(index);

    //  index.lVal = i + curPopupMenuNum;

    //  popupMenu.InsertInMenuBar(index);
    //  CString strName = popupMenu.get_Name();
    //  if (strName.CompareNoCase(_T("TaiyuanBoilerElevation")) == 0)
    //  {
    //      //beExit = TRUE;
    //      break;
    //  }
    //}
    return true;
}
static void initLoadMenu()
{
    CString strPath = CUtility::GetAppPath();
    strPath = strPath.Left(strPath.ReverseFind('\\'));
    if (strPath != _T(""))
    {
        strPath += _T("\\xhhk.cuix");
    }
    LoadPartialMenu(strPath, _T("xhhk"));
}

On_kInitAppMsg

initLoadMenu();

推荐使用第一种方式,不需要加载那么多的头文件

image-20250604151542564

CAD.net调用内置对话框

C#
[CommandMethod("CmdTest_ShowDialog")]
public void CmdTest_ShowDialog()
{
    var dm = ZwSoft.ZwCAD.ApplicationServices.Application.DocumentManager;
    var doc = dm.MdiActiveDocument;
    var ed = doc.Editor;
    var db = doc.Database;
    ed.WriteMessage("\n测试cad颜色面板+线型面板");

    var cd = new ZwSoft.ZwCAD.Windows.ColorDialog();
    var dr = cd.ShowDialog();
    if (dr == System.Windows.Forms.DialogResult.OK)
        ed.WriteMessage("\ncad颜色选择了: " + cd.Color.ToString());

    var ld = new ZwSoft.ZwCAD.Windows.LinetypeDialog();
    dr = ld.ShowDialog();
    if (dr == System.Windows.Forms.DialogResult.OK)
        ed.WriteMessage("\ncad线型选择了: " + ld.Linetype.ToString());

    var dlg = new System.Windows.Forms.ColorDialog();
    dr = dlg.ShowDialog();
    if (dr == System.Windows.Forms.DialogResult.OK)
        ed.WriteMessage("\n系统颜色选择了: " + dlg.Color.ToString());
}

动画

====

CSS3,我们可以创建动画,它可以取代许多网页动画图像,Flash 动画,和 Javascripts。

CSS3 @keyframes 规则

要创建CSS3动画,你将不得不了解@keyframes规则。

@keyframes规则是用来创建动画。 @keyframes规则内指定一个 CSS样式和动画将逐步从目前的样式更改为新的样式。

**注意:**Internet Explorer 10、Firefox 以及 Opera 支持 @keyframes 规则和 animation 属性。 Chrome 和 Safari 需要前缀 -webkit-。

CSS3 动画

当在@keyframe创建动画,把它绑定到一个选择器,否则动画不会有任何效果。

指定至少这两个 CSS3 的动画属性绑定向一个选择器:

  • 规定动画的名称
  • 规定动画的时长

例子:

Text Only
1
2
3
4
5
#animated_div {
    animation: animated_div 5s infinite;
    -moz-animation: animated_div 5s infinite;
    -webkit-animation: animated_div 5s infinite;
}

CSS3动画是什么?

  • 动画是使元素从一种样式逐渐变化为另一种样式的效果。
  • 您可以改变任意多的样式任意多的次数。
  • 请用百分比来规定变化发生的时间,或用关键词 "from" 和 "to",等同于 0% 和 100%。
  • 0% 是动画的开始,100% 是动画的完成。
  • 为了得到最佳的浏览器支持,您应该始终定义 0% 和 100% 选择器。

例子:

Text Only
 1
 2
 3
 4
 5
 6
 7
 8
 9
10
11
12
13
14
15
16
17
18
19
20
21
22
23
24
25
@keyframes animated_div {
    0% {
        left: 0px;
    }
    20% {
        left: 50px;
        background-color: green;
    }
    40% {
        left: 140px;
        background-color: red;
    }
    60% {
        left: 280px;
        background-color: yellow;
    }
    80% {
        left: 425px;
        background-color: blue;
    }
    100% {
        left: 0px;
        background-color: pink;
    }
}

常用属性

属性 描述 CSS
@keyframes 规定动画。 3
animation 所有动画属性的简写属性,除了 animation-play-state 属性。 3
animation-name 规定 @keyframes 动画的名称。 3
animation-duration 规定动画完成一个周期所花费的秒或毫秒。默认是 0。 3
animation-timing-function 规定动画的速度曲线。默认是 "ease"。 3
animation-delay 规定动画何时开始。默认是 0。 3
animation-iteration-count 规定动画被播放的次数。默认是 1。 3
animation-direction 规定动画是否在下一周期逆向地播放。默认是 "normal"。 3
animation-play-state 规定动画是否正在运行或暂停。默认是 "running"。 3