跳转至

MyBlog

ObjectARX.net 编写PaletteSet

创建基础的PaletteSet

C#
1
2
3
4
5
6
7
8
9
[Autodesk.AutoCAD.Runtime.CommandMethod("AddMyPaletteSet")]
public void AddMyPaletteSet()
{
    Autodesk.AutoCAD.Windows.PaletteSet myPaletteSet = new Autodesk.AutoCAD.Windows.PaletteSet("我的PallteSet");
    myPaletteSet.Add("我的工具集", new System.Windows.Forms.Control("我的工具集"));   
    myPaletteSet.Add("我的颜色", new System.Windows.Forms.Control("我的颜色")); 
    myPaletteSet.Add("我的控件", new System.Windows.Forms.Control("我的控件"));
    myPaletteSet.Visible = true;
}

处理每个control

新建一个UserControl1

底部用用两个==SplitContainer==将列表分隔成

image-20240828183841663

image-20240828183906696

FolderTreeView.cs

C#
 class FolderTreeView
    {
        public static void AddFolderToTree(string folderPath, TreeNode treeNode)
        {
            DirectoryInfo directoryInfo = new DirectoryInfo(folderPath);
            TreeNode[] subTreeNodes = new TreeNode[directoryInfo.GetFiles().Length + directoryInfo.GetDirectories().Length];

            // Add files
            int fileIndex = 0;
            // Add directories
            int directoryIndex = 0;
            foreach (DirectoryInfo subDirectoryInfo in directoryInfo.GetDirectories())
            {
                TreeNode directoryNode = new TreeNode(subDirectoryInfo.Name);
                subTreeNodes[fileIndex + directoryIndex++] = directoryNode;
                AddFolderToTree(subDirectoryInfo.FullName, directoryNode);
            }

            // Add nodes to the tree
            foreach (TreeNode subTreeNode in subTreeNodes)
            {
                if (subTreeNode != null)
                {
                    treeNode.Nodes.Add(subTreeNode);
                }
            }
        }

        public static void DisplayFolderTree(TreeView treeView, string folderPath)
        {
            TreeNode rootNode = treeView.Nodes.Add(Path.GetFileName(folderPath));
            AddFolderToTree(folderPath, rootNode);
        }
    }

UserControl1.cs

C#
using System;
using System.Collections.Generic;
using System.ComponentModel;
using System.Drawing;
using System.Data;
using System.Linq;
using System.Text;
using System.Threading.Tasks;
using System.Windows.Forms;
using System.IO;

namespace ZwForCdMonolithicPower.Net
{
    public partial class UserControl1 : UserControl
    {
        private string strPath;
        private string strRoot;

        private List<string> imagePathList = new List<string>(); //获取列表图片路径
        public UserControl1(string v)
        {
            InitializeComponent();
            strRoot = "E:\\ShGit\\zwcadgitlab\\digitalminedrawing\\标准对象库\\神东矿图标准对象库\\";
        }

        private void UserControl1_Load(object sender, EventArgs e)
        {
            // 使用方法:
            // treeView1,并且你想显示"C:\MyFolder"目录的内容。
            FolderTreeView.DisplayFolderTree(treeView1, strRoot + "整理后的对象库");
        }

        public static void AddFolderToTree(string folderPath, TreeNode treeNode)
        {
            DirectoryInfo directoryInfo = new DirectoryInfo(folderPath);
            TreeNode[] subTreeNodes = new TreeNode[directoryInfo.GetFiles().Length + directoryInfo.GetDirectories().Length];

            // Add files
            int fileIndex = 0;
            foreach (FileInfo fileInfo in directoryInfo.GetFiles())
            {
                TreeNode fileNode = new TreeNode(fileInfo.Name);
                subTreeNodes[fileIndex++] = fileNode;
            }

            // Add directories
            int directoryIndex = 0;
            foreach (DirectoryInfo subDirectoryInfo in directoryInfo.GetDirectories())
            {
                TreeNode directoryNode = new TreeNode(subDirectoryInfo.Name);
                subTreeNodes[fileIndex + directoryIndex++] = directoryNode;
                AddFolderToTree(subDirectoryInfo.FullName, directoryNode);
            }

            // Add nodes to the tree
            foreach (TreeNode subTreeNode in subTreeNodes)
            {
                if (subTreeNode != null)
                {
                    treeNode.Nodes.Add(subTreeNode);
                }
            }
        }
        public static void DisplayFolderTree(TreeView treeView, string folderPath)
        {
            TreeNode rootNode = treeView.Nodes.Add(Path.GetFileName(folderPath));
            AddFolderToTree(folderPath, rootNode);
        }
        //2.加载数据项:遍历文件和目录,按照不同类型添加数据项Item及其子项
        private void LoadDir(DirectoryInfo dir)
        {
            listView2.BeginUpdate();

            //获取当前目录JPG文件列表 GetFiles获取指定目录中文件的名称(包括其路径)
            FileInfo[] fileInfo = dir.GetFiles("*.png");
            //this.imageList1.ColorDepth = ColorDepth.Depth32Bit;
            this.imageList1.ColorDepth = ColorDepth.Depth32Bit;
            for (int i = 0; i < fileInfo.Length; i++)
            {
                //获取文件完整目录
                string picDirPath = fileInfo[i].FullName;
                //记录图片源路径 双击显示图片时使用
                imagePathList.Add(picDirPath);
                //图片加载到ImageList控件和imageList图片列表
                this.imageList1.Images.Add(Image.FromFile(picDirPath));
            }
            //显示文件列表
            this.listView2.Items.Clear();
            this.listView2.LargeImageList = this.imageList1;
            this.listView2.View = View.LargeIcon;        //大图标显示
            //imageList1.ImageSize = new Size(40, 40);   //不能设置ImageList的图像大小 属性处更改

            //增加图片至ListView控件中
            for (int i = 0; i < imageList1.Images.Count; i++)
            {
                ListViewItem lvi = new ListViewItem();
                lvi.ImageIndex = i;
                lvi.Text = fileInfo[i].Name.Split('.')[0];
                this.listView2.Items.Add(lvi);
            }

            listView2.EndUpdate();
        }

        private void treeView1_AfterSelect(object sender, TreeViewEventArgs e)
        {
            // 获取选中的节点
            TreeNode selectedNode = treeView1.SelectedNode;
            //strNodeName = selectedNode.Text;
            strPath = selectedNode.FullPath;
            listView2.Clear();
            imageList1.Images.Clear();
            LoadDir(new DirectoryInfo(strRoot + strPath));
        }
    }
}

Class1.cs

C#
using System;
using System.Collections.Generic;
using System.Linq;
using System.Text;
using System.Threading.Tasks;
using ZwSoft.ZwCAD.Runtime;

namespace ZwForCdMonolithicPower.Net
{
    public class Class1
    {
        [CommandMethod("AddMyPaletteSet")]
        public void AddMyPaletteSet()
        {
            ZwSoft.ZwCAD.Windows.PaletteSet myPaletteSet = new ZwSoft.ZwCAD.Windows.PaletteSet("我的PallteSet");
            myPaletteSet.Add("我的工具集", new UserControl1("我的工具集"));
            myPaletteSet.Add("我的颜色", new System.Windows.Forms.Control("我的颜色"));
            myPaletteSet.Add("我的控件", new System.Windows.Forms.Control("我的控件"));
            myPaletteSet.Visible = true;
        }
    }
}

Cad.Net开发问题:可停靠面板无法使用下拉列表

问题描述

AutoCAD.Net 开发过程中,可停靠面板(PaletteSet)如果包含下拉列表控件(ComboBox),则下拉列表可能无法正常使用。具体表现为:当 PaletteSet的Dock 属性不为 DockSides.None 时,下拉框会在移动鼠标时自动收回,无法选中。

解决方案

该问题可以通过设置 PaletteSet.KeepFocus=True 得到解决。但这样会产生另一个问题:鼠标从面板范围移动到绘图工作区时,工作区无法自动获得焦点,需要单击鼠标才行。这点实际体验很不舒服,每次切换都要点一下绘图区,但当时没有更好的解决方案,只能将就。

最终解决方案

后来在翻资料时无意找到解决方案:在ComboBox的下拉事件加入判断就行,示例代码如下:

C#
ComboBox _comboBox = new ComboBox();
private void _comboBox_DropDown(object sender, EventArgs e)
{
    if (_set.Dock != DockSides.None)
        _set.KeepFocus = true;
}
private void _comboBox_DropDownClosed(object sender, EventArgs e)
{
    if (_set.Dock != DockSides.None)
        _set.KeepFocus = false;
}

其实很简单,捕捉 ComboBox 下拉事件,在下拉时候保持 PaletteSet 的焦点,下拉收回的时候取消焦点。只是当时没想到而已,在这里记录下,以飨来者。

原文部分截图如下: http://www.doc88.com/p-9925263869083.html

  • 2020.10.20更新:

好吧,还有问题,PaletteSet在停靠状态时候,使用Win10系统输入法,快速输入中文时,大概率引发致命错误。取消停靠,或者输入英文,或者使用第三方输入中文,或者慢慢输入法输入中文,都不会引发该问题,奇葩!

困扰了很久也没找到原因,只能当是未处理的Bug作罢

后来发现设置==PaletteSet.KeepFocus== 对这个Bug 同样有效,好吧,就是这样

WPF创建右下角弹窗

WpfRightNotify.xaml

SizeToContent="Height"//可以根据内容调整高度

C#
<Window
    x:Class="ZwWhForXhhk.Net.View.WpfRightNotify"
    xmlns="http://schemas.microsoft.com/winfx/2006/xaml/presentation"
    xmlns:x="http://schemas.microsoft.com/winfx/2006/xaml"
    xmlns:d="http://schemas.microsoft.com/expression/blend/2008"
    xmlns:local="clr-namespace:ZwWhForXhhk.Net.View"
    xmlns:materialDesign="http://materialdesigninxaml.net/winfx/xaml/themes"
    xmlns:materialDesignColors="clr-namespace:MaterialDesignColors;assembly=MaterialDesignColors"
    xmlns:mc="http://schemas.openxmlformats.org/markup-compatibility/2006"
    Width="300"
    Height="150"
    AllowsTransparency="True"
    Background="Transparent"
    Opacity="0"
    ShowInTaskbar="False"
    Topmost="True"
    SizeToContent="Height"
    WindowStyle="None">
    <Window.Resources>
        <ResourceDictionary>
            <ResourceDictionary.MergedDictionaries>
                <materialDesign:BundledTheme
                    BaseTheme="Light"
                    PrimaryColor="DeepPurple"
                    SecondaryColor="Blue" />
                <ResourceDictionary Source="pack://application:,,,/MaterialDesignThemes.Wpf;component/Themes/MaterialDesign2.Defaults.xaml" />
            </ResourceDictionary.MergedDictionaries>
        </ResourceDictionary>
    </Window.Resources>
    <Border
        x:Name="RootBorder"
        Padding="10"
        Background="#FF333333"
        CornerRadius="10">
        <Grid>
            <Grid.RowDefinitions>
                <RowDefinition Height="Auto" />
                <RowDefinition Height="*" />
            </Grid.RowDefinitions>
            <Grid.ColumnDefinitions>
                <ColumnDefinition Width="Auto" />
                <ColumnDefinition Width="*" />
            </Grid.ColumnDefinitions>

            <!--<Button
                    x:Name="IconButton"
                    Background="Transparent"
                    Style="{StaticResource MaterialDesignFlatButton}">
                    <materialDesign:PackIcon
                        Width="24"
                        Height="24"
                        Kind="{Binding Icon}" />
                </Button>-->
            <StackPanel Orientation="Horizontal">
                <materialDesign:PackIcon
                    x:Name="IconImage"
                    VerticalAlignment="Center"
                    Kind="{Binding Icon}" />
                <TextBlock
                    x:Name="IconText"
                    Margin="10,0,0,0"
                    VerticalAlignment="Center"
                    FontSize="16"
                    FontWeight="Bold" />
            </StackPanel>
            <Button
                x:Name="CloseButton"
                Grid.Column="1"
                HorizontalAlignment="Right"
                Background="Transparent"
                Click="CloseButton_Click"
                Style="{StaticResource MaterialDesignFlatButton}"
                ToolTip="Close">
                <materialDesign:PackIcon Kind="Close" />
            </Button>
            <RichTextBox
                x:Name="MessageText"
                Grid.Row="1"
                Grid.ColumnSpan="2"
                AcceptsReturn="True"
                FontSize="12"
                Foreground="White"
                IsReadOnly="True"
                VerticalScrollBarVisibility="Auto" />
        </Grid>
    </Border>
</Window>

WpfRightNotify.xaml.cs

C#
namespace ZwWhForXhhk.Net.View
{
    /// <summary>
    /// WpfRightNotify.xaml 的交互逻辑
    /// </summary>
    public partial class WpfRightNotify : Window
    {
        private DispatcherTimer timer;

        public WpfRightNotify(string message, ToastType type, int durationSeconds)
        {
            InitializeComponent();
            MessageText.AppendText(message);
            SetStyle(type);

            Loaded += (s, e) =>
            {
                var area = SystemParameters.WorkArea;
                Left = area.Right - Width/* - 10*/;
                Top = area.Bottom - Height/* - 10*/ - ToastManager.GetYOffset(this);
                ShowAnimation(durationSeconds);
            };
        }
        private void SetStyle(ToastType type)
        {
            switch (type)
            {
                case ToastType.Success:
                    RootBorder.Background = new System.Windows.Media.SolidColorBrush(System.Windows.Media.Colors.SeaGreen);
                    IconText.Text = "成功";
                    IconImage.Kind = (MaterialDesignThemes.Wpf.PackIconKind)Enum.Parse(typeof(MaterialDesignThemes.Wpf.PackIconKind), "CheckBold");
                    IconImage.Background = new System.Windows.Media.SolidColorBrush(System.Windows.Media.Colors.SeaGreen);
                    IconImage.Foreground = new System.Windows.Media.SolidColorBrush(System.Windows.Media.Colors.DarkGreen);
                    break;
                case ToastType.Warning:
                    RootBorder.Background = new System.Windows.Media.SolidColorBrush(System.Windows.Media.Colors.Orange);
                    IconText.Text = "警告";
                    IconImage.Kind = (MaterialDesignThemes.Wpf.PackIconKind)Enum.Parse(typeof(MaterialDesignThemes.Wpf.PackIconKind), "Alert");
                    IconImage.Background = new System.Windows.Media.SolidColorBrush(System.Windows.Media.Colors.Orange);
                    IconImage.Foreground = new System.Windows.Media.SolidColorBrush(System.Windows.Media.Colors.DarkOrange);
                    break;
                case ToastType.Error:
                    RootBorder.Background = new System.Windows.Media.SolidColorBrush(System.Windows.Media.Colors.IndianRed);
                    IconText.Text = "错误";
                    IconImage.Kind = (MaterialDesignThemes.Wpf.PackIconKind)Enum.Parse(typeof(MaterialDesignThemes.Wpf.PackIconKind), "Close");
                    IconImage.Background = new System.Windows.Media.SolidColorBrush(System.Windows.Media.Colors.IndianRed);
                    IconImage.Foreground = new System.Windows.Media.SolidColorBrush(System.Windows.Media.Colors.DarkRed);
                    break;
                default:
                    RootBorder.Background = new System.Windows.Media.SolidColorBrush(System.Windows.Media.Colors.DimGray);
                    IconText.Text = "信息";
                    IconImage.Kind = (MaterialDesignThemes.Wpf.PackIconKind)Enum.Parse(typeof(MaterialDesignThemes.Wpf.PackIconKind), "InformationVariantBoxOutline");
                    IconImage.Background = new System.Windows.Media.SolidColorBrush(System.Windows.Media.Colors.DimGray);
                    IconImage.Foreground = new System.Windows.Media.SolidColorBrush(System.Windows.Media.Colors.DarkGray);
                    break;
            }
        }

        private void ShowAnimation(int durationSeconds)
        {
            //var fadeIn = new DoubleAnimation(0, 1, TimeSpan.FromMilliseconds(300));
            double right = System.Windows.SystemParameters.WorkArea.Right;//工作区最右边的值
            DoubleAnimation animation = new DoubleAnimation();
            animation.Duration = new Duration(TimeSpan.FromMilliseconds(3000));//NotifyTimeSpan是自己定义的一个int型变量,用来设置动画的持续时间
            animation.From = right;
            animation.To = right - 300;//设定通知从右往左弹出
            BeginAnimation(OpacityProperty, animation);

            timer = new DispatcherTimer { Interval = TimeSpan.FromSeconds(durationSeconds) };
            timer.Tick += (s, e) =>
            {
                timer.Stop();
                CloseAnimation();
            };
            timer.Start();
        }

        private void CloseAnimation()
        {
            var fadeOut = new DoubleAnimation(1, 0, TimeSpan.FromMilliseconds(300));
            fadeOut.Completed += (s, e) =>
            {
                Close();
                ToastManager.RemoveToast(this);
            };
            BeginAnimation(OpacityProperty, fadeOut);
        }

        private void CloseButton_Click(object sender, RoutedEventArgs e)
        {
            this.Close();
            ToastManager.RemoveToast(this);
            //System.Windows.MessageBox.Show("关闭");
        }
    }

    public enum ToastType
    {
        Info,
        Success,
        Warning,
        Error
    }

    public static class ToastManager
    {
        private static List<WpfRightNotify> toasts = new List<WpfRightNotify>();

        public static void ShowToast(string message, ToastType type = ToastType.Info, int durationSeconds = 3)
        {
            var toast = new WpfRightNotify(message, type, durationSeconds);
            toasts.Add(toast);
            toast.Show();
        }

        public static double GetYOffset(WpfRightNotify current)
        {
            double offset = 0;
            foreach (var toast in toasts)
            {
                if (toast == current) break;
                offset += toast.Height + 10;
            }
            return offset;
        }

        public static void RemoveToast(WpfRightNotify toast)
        {
            toasts.Remove(toast);
        }
    }
}

调用方式

C#
1
2
3
4
ToastManager.ShowToast("操作成功!", ToastType.Success, 15);
ToastManager.ShowToast("操作失败!", ToastType.Error, 15);
ToastManager.ShowToast("警告!", ToastType.Warning, 15);
ToastManager.ShowToast("#define ACED_SERVICES  ACRX_T(\"AcEdServices\")\r\n#define ACED_EDITOR_OBJ ACRX_T(\"AcEditor\")\r\n\r\n// The various modes for context menus.\r\nenum AcadContextMenuMode {\r\n    kDefault = 0,           // No selection set, no command active.\r\n    kEdit,                  // Select set, no command active.\r\n    kCommand,               // Command active.\r\n    kHotGrip,               // Hot grip exists.\r\n    kOsnap,                 // Shift key down.   \r\n#ifdef _ADESK_MAC_\r\n\tkCMPaperSpace           // In paper space. \r\n#endif\r\n};!", ToastType.Info, 15);

image-20250417194136084

SVG2Image

安装gmk+,[github] (https://github.com/tschoonj/GTK-for-Windows-Runtime-Environment-Installer)

安装需要的库

Bash
pip install cairosvg

https://www.gtk.org/docs/installations/windows/

https://github.com/wingtk/gvsbuild

安装gtk3-runtime-3.24.31-2022-01-04-ts-win64.exe

安装python3.12

C:\Program Files\GTK3-Runtime Win64\bin添加到PATH中

svg2bmp

Python
"""
SVG文件转换为BMP格式。
"""
from PIL import Image
import cairosvg
import os
from io import BytesIO
import sys


# 获取同一目录下的所有svg文件的绝对路径
def getFileName(filedir):
    """
    获取指定目录下所有以"dwg"为后缀的文件的绝对路径列表。

    参数:
    filedir: str - 文件目录的路径。

    返回:
    List[str] - 包含所有符合条件的文件的绝对路径的列表,如果没有找到任何文件,则返回空列表。
    """
    # 使用列表推导式和os.walk遍历指定目录及其子目录,查找所有以"svg"结尾的文件
    # os.path.join用于拼接文件的绝对路径
    file_list = [
        os.path.join(root, filespath)
        for root, dirs, files in os.walk(filedir)
        for filespath in files
        if str(filespath).endswith("svg")
    ]
    # 如果file_list不为空,则返回file_list,否则返回空列表
    return file_list if file_list else []


# 获取当前脚本目录
def get_current_file_path():
    # 通过命令行参数获取当前脚本的绝对路径
    abs_file = sys.argv[0]
    # 将路径中的斜杠替换为反斜杠,以适应Windows系统
    windows_path = abs_file.replace("/", "\\")
    # 去除路径中的脚本文件名,仅保留目录部分
    windows_path = windows_path[: windows_path.rfind("\\")]
    # 返回脚本所在的目录路径
    return windows_path


if __name__ == "__main__":
    currentPath = get_current_file_path()
    print(currentPath)
    file_list = getFileName(currentPath)
    print(file_list)
    for file in file_list:
        # 假设你有一个SVG文件名为'example.svg'
        png_file = file.replace(".svg", ".png")
        cairosvg.svg2png(url=file, write_to=png_file, output_width=64, output_height=64)

        # 打开 PNG 文件
        png_image = Image.open(png_file)

        bmp_file = file.replace(".svg", ".bmp")
        # 将 PNG 文件保存为 BMP
        png_image.save(bmp_file, 'BMP')

        # 使用svglib将SVG文件转换为报告实验室图形对象
        os.remove(png_file)

svgToIcon

在Windows上,你需要安装ImageMagick和Wand库。以下是详细的安装步骤:

安装ImageMagick

  1. 下载ImageMagick

  2. 访问 ImageMagick官方下载页面

  3. 点击 "Binary releases" 下的 "Windows"。
  4. 下载适用于你的Windows版本的预编译二进制包(例如,ImageMagick-7.0.10-Q16-HDRI-x64-dll.exe)。

  5. 安装ImageMagick

  6. 运行下载的安装程序。

  7. 按照安装向导的指示完成安装。
  8. 在安装过程中,确保选中 "Add application directory to your system path" 选项,这样ImageMagick的路径会被添加到系统环境变量中。

  9. 安装Wand库

  10. 安装Python环境

  11. 如果你还没有安装Python,请从 Python官方下载页面 下载并安装适用于Windows的Python版本。

  12. 使用pip安装Wand

  13. 打开命令提示符(CMD)。

  14. 输入以下命令来安装Wand库:

    Bash
    pip install Wand
    
  15. 如果提示权限问题,请以管理员身份运行命令提示符,并重复上述命令。

完整代码

svgtoimage.py

Python
"""
SVG文件转换为BMP格式。
"""
from PIL import Image
import cairosvg
import os
from io import BytesIO
import sys
from wand.image import Image as wimg
from wand.color import Color
# 获取同一目录下的所有svg文件的绝对路径
def getFileName(filedir):
    """
    获取指定目录下所有以"dwg"为后缀的文件的绝对路径列表。

    参数:
    filedir: str - 文件目录的路径。

    返回:
    List[str] - 包含所有符合条件的文件的绝对路径的列表,如果没有找到任何文件,则返回空列表。
    """
    # 使用列表推导式和os.walk遍历指定目录及其子目录,查找所有以"svg"结尾的文件
    # os.path.join用于拼接文件的绝对路径
    file_list = [
        os.path.join(root, filespath)
        for root, dirs, files in os.walk(filedir)
        for filespath in files
        if str(filespath).endswith("svg")
    ]
    # 如果file_list不为空,则返回file_list,否则返回空列表
    return file_list if file_list else []


# 获取当前脚本目录
def get_current_file_path():
    # 通过命令行参数获取当前脚本的绝对路径
    abs_file = sys.argv[0]
    # 将路径中的斜杠替换为反斜杠,以适应Windows系统
    windows_path = abs_file.replace("/", "\\")
    # 去除路径中的脚本文件名,仅保留目录部分
    windows_path = windows_path[: windows_path.rfind("\\")]
    # 返回脚本所在的目录路径
    return windows_path

# svg转ico
def svgtoico(input_file):
    """
    将SVG文件转换为ICO格式。

    参数:
    svg_file: str - SVG文件的路径。

    返回:
    无返回值,直接生成同名的ICO文件。
    """
    # # 保存为ICO文件
    ico_file = input_file.replace(".svg", ".ico")
    sizes = [(256, 256), (128, 128), (64, 64), (48, 48), (32, 32), (16, 16)]

    with wimg(filename=input_file, background=Color("transparent")) as img:
        img.background_color = Color('transparent')  # 设置背景颜色为透明
        img.alpha_channel = 'set'  # 确保图像有透明通道

        with wimg() as ico:
            for size in sizes:
                with img.clone() as icon:
                    icon.resize(size[0], size[1])
                    ico.sequence.append(icon)
            ico.save(filename=ico_file)
# ... existing imports ...
import json

def load_config():
    """
    加载配置文件,如果不存在则创建默认配置。

    返回:
    dict - 包含配置信息的字典
    """
    config_path = os.path.join(get_current_file_path(), 'config.json')
    default_config = {
        "image_size": {
            "width": 64,
            "height": 64
        },
        "image_type": {
            "type": "BMP"
        }
    }

    try:
        with open(config_path, 'r', encoding='utf-8') as f:
            config = json.load(f)
            # 确保所有必需的配置项都存在
            if 'image_size' not in config:
                config['image_size'] = default_config['image_size']
            if 'width' not in config['image_size']:
                config['image_size']['width'] = default_config['image_size']['width']
            if 'height' not in config['image_size']:
                config['image_size']['height'] = default_config['image_size']['height']
            if 'image_type' not in config:
                config['image_type'] = default_config['image_type']
            if 'type' not in config['image_type']:
                config['image_type']['type'] = default_config['image_type']['type']
            return config
    except FileNotFoundError:
        # 如果配置文件不存在,创建默认配置
        with open(config_path, 'w', encoding='utf-8') as f:
            json.dump(default_config, f, indent=4)
        return default_config

def svgtoimage(svg_file, config=None):
    """
    将SVG文件转换为指定格式的图像文件。

    参数:
    svg_file: str - SVG文件的路径
    config: dict - 配置信息,包含图像尺寸等参数

    返回:
    str - 生成的图像文件路径
    """
    if config is None:
        config = load_config()

    size = (
        config['image_size']['width'],
        config['image_size']['height']
    )

    format = config['image_type']['type']
    # 生成输出文件路径
    output_file = svg_file.replace(".svg", f".{format.lower()}")

    # 如果是ICO格式,创建多个尺寸的图标
    if format.upper() == 'ICO':
        # 创建不同尺寸的图标
        png_data = cairosvg.svg2png(
        url=svg_file, 
        output_width=max(size[0], 256),  # 使用较大的尺寸以保持质量
        output_height=max(size[1], 256)
        )

        # 从字节流创建PIL Image对象
        img = Image.open(BytesIO(png_data))
        svgtoico(svg_file)
    else:
        # 其他格式直接保存
        png_data = cairosvg.svg2png(
        url=svg_file, 
        output_width=size[0],  # 使用较大的尺寸以保持质量
        output_height=size[1]
        )

        # 从字节流创建PIL Image对象
        img = Image.open(BytesIO(png_data))
        img.save(output_file, format=format)

    print(f"输出文件为: {output_file}")
    return output_file

if __name__ == "__main__":
    currentPath = get_current_file_path()
    print(currentPath)
    file_list = getFileName(currentPath)
    print(file_list)

    # 加载配置
    config = load_config()

    for file in file_list:
        # 使用配置信息进行转换
        svgtoimage(file, config=config)

config.json

JSON
1
2
3
4
5
6
7
8
9
{
    "image_size": {
        "width": 16,
        "height": 16
    },
    "image_type": {
        "type": "ico"
    }
}

ObjectARX.net学习(2)-CLR 托管C++ 类库

正常cpp项目

类代码如下所示:

C++
#pragma once
#ifndef LX_DLL_CLASS_EXPORTS
#define LX_DLL_CLASS __declspec(dllexport)
#else
#define LX_DLL_CLASS __declspec(dllimport)
#endif
#include <afx.h>
class LX_DLL_CLASS CSelCircleInfo
{
public:
    CSelCircleInfo();
    ~CSelCircleInfo();
    CString sel();
    void test();
};
  • 类库需要导出
  • CString需要引入头文件

正常的clr项目

创建clr类库项目

加载cpp的头文件和库文件

设置信息

image-20240425105414082

  • 注意.net版本
  • 由于cpp项目是MFC的dll,这里需要使用在共享DLL中使用MFC

代码如下所示:

C#
#pragma once
#include "CSelCircleInfo.h"

using namespace System;
namespace ClassLibrary1 {
    public ref class MgCSelCircleInfo
    {
    public:
        MgCSelCircleInfo() : nativeCSelCircleInfo(new CSelCircleInfo()) {}
        ~MgCSelCircleInfo() { this->!MgCSelCircleInfo(); }
        !MgCSelCircleInfo() { delete nativeCSelCircleInfo; }

        System::String^ Sel()
        {
            CString str = nativeCSelCircleInfo->sel();
            return gcnew System::String(str.GetString());
            /*std::string str = nativeCSelCircleInfo->sel();
            String^ managedString = gcnew String(str.c_str());
            return managedString;*/
        }

        void Test()
        {
            nativeCSelCircleInfo->test();
        }

    private:
        CSelCircleInfo* nativeCSelCircleInfo; // 原生CSelCircleInfo类的实例指针
    };
}

正常的.net项目

引入clr创建的dll

代码中使用

  • 先using导入类库
C#
ClassLibrary1.MgCSelCircleInfo mgCSelCircleInfo = new MgCSelCircleInfo();
            string strResult = mgCSelCircleInfo.Sel();

ObjectARX.net学习(1)

先下载工具

https://spiderinnet1.typepad.com/

下载ANAW2017

用向导创建项目

创建简单demo

C#
#region Namespaces

using System;
using System.Text;
using System.Linq;
using System.Xml;
using System.Reflection;
using System.ComponentModel;
using System.Collections;
using System.Collections.Generic;
using System.Diagnostics;
using System.Windows;
using System.Windows.Media.Imaging;
using System.Windows.Forms;
using System.Drawing;
using System.IO;

using Autodesk.AutoCAD.ApplicationServices;
using Autodesk.AutoCAD.DatabaseServices;
using Autodesk.AutoCAD.Runtime;
using Autodesk.AutoCAD.EditorInput;
using Autodesk.AutoCAD.Geometry;
using Autodesk.AutoCAD.Windows;

using Autodesk.AutoCAD.GraphicsSystem;
using Autodesk.AutoCAD.GraphicsInterface;

using MgdAcApplication = Autodesk.AutoCAD.ApplicationServices.Application;
using MgdAcDocument = Autodesk.AutoCAD.ApplicationServices.Document;
using AcWindowsNS = Autodesk.AutoCAD.Windows;

#endregion


namespace AcadNetAddinCS1
{
    public class CmdGroup1
    {
        [CommandMethod("CmdGroup1", "Command1", null, CommandFlags.Modal, null, "AcadNetAddinCS1", "Command1")]
        public void Command1_Method()
        {
            Database db = HostApplicationServices.WorkingDatabase;
            Editor ed = MgdAcApplication.DocumentManager.MdiActiveDocument.Editor;

            try
            {
                using (Transaction tr = db.TransactionManager.StartTransaction())
                {
                    //TODO: add your code below.    
                    Debug.WriteLine("Command1 ran.");
                    ed.WriteMessage("Command1 ran.\n");    


                    tr.Commit();
                }
            }
            catch (System.Exception ex)
            {
                Debug.WriteLine(ex.ToString());
                ed.WriteMessage(ex.ToString());
            }
        }
        [CommandMethod("drawLine")]
        public void Command1_drawLine()
        {
            Database db = HostApplicationServices.WorkingDatabase;
            Point3d startPt = new Point3d(0, 100, 0);
            Point3d endPt = new Point3d(100, 100, 0);
            Line line = new Line(startPt, endPt);
            using (Transaction trans = db.TransactionManager.StartTransaction())
            {
                try
                {
                    BlockTable bt = (BlockTable)trans.GetObject(db.BlockTableId, OpenMode.ForRead);
                    BlockTableRecord btr = (BlockTableRecord)trans.GetObject(bt[BlockTableRecord.ModelSpace], OpenMode.ForWrite);
                    btr.AppendEntity(line);
                    trans.AddNewlyCreatedDBObject(line, true);
                    trans.Commit();
                }
                catch (System.Exception ex)
                {
                    trans.Abort();
                }
            }
        }

    }
}

ObjectARX各版本免费下载

https://blog.csdn.net/lhxy24/article/details/101058720

ObjectARX 2020 Wizard

AutoCAD 2020 DotNet Wizard

ObjectARX2020 bug修改

1、C:\Program Files (x86)\Autodesk\ObjectARX 2020 Wizards\ArxAppWiz\Scripts\1033\default.js

从C:\Program Files (x86)\Autodesk\ObjectARX 2020 Wizards\ArxAppWiz\Templates\1033为新建项目的模板,拷贝这里面的文件,x64win32.vcxproj设置,要改变

Bash
1
2
3
4
5
6
7
<PropertyGroup Label="Globals">
    <ArxAppType>[!output PRJ_TYPE_APP]</ArxAppType>
    <RDS>[!output RDS_SYMB]</RDS>
    <TargetName Condition="'$(RDS)'!=''">$(RDS)$(ProjectName)</TargetName>
    <ProjectGuid>{F87873B0-2B5D-4D52-8FD5-BE1CDC50B2E3}</ProjectGuid>
    <WindowsTargetPlatformVersion>10.0.16299.0</WindowsTargetPlatformVersion>
  </PropertyGroup>

后面PropertyGroup 标签中的WindowsTargetPlatformVersion要考到前面来,否则找不到系统库。目标平台会被默认为win8.1,无法按win10SDK版本号导入目录。

2、C:\Program Files (x86)\Autodesk\ObjectARX 2020 Wizards\文件夹内外都有属性页设置,到底用的哪个还没整清楚。 应该是拷贝目录外面的,

Bash
1
2
3
CopyPropsFile ( 'Autodesk.arx-2020.props', strProjectName) ;
CopyPropsFile ( 'Autodesk.arx-2020-net.props', strProjectName) ;
CopyPropsFile ( 'crx.props', strProjectName) ;

因为crx.props在外面。

3、接2中,无论拷贝哪个属性页,目前是在项目中的vcxproj文件中,

合并上面这两个文件,之后 Autodesk.arx-2020.props文件会在合并下面6个文件 前三个

Bash
1
2
3
<Import Condition="'$(ArxAppType)'=='dbx' or '$(ArxAppType)'=='dbxnet'" Project="$(ArxSdkDir)\inc\dbx.props" />
<Import Condition="'$(ArxAppType)'=='crx' or '$(ArxAppType)'=='crxnet'" Project="$(ArxSdkDir)\inc\crx.props" />
<Import Condition="'$(ArxAppType)'=='arx' or '$(ArxAppType)'=='arxnet'" Project="$(ArxSdkDir)\inc\arx.props" />

后3个文件主要是不同项目类型的引用库的文件。

Bash
1
2
3
<Import Condition="'$(Configuration)'=='Release'" Project="$(ArxSdkDir)\inc\rxsdk_Releasecfg.props" />
<Import Condition="'$(Configuration)'=='Debug'" Project="$(ArxSdkDir)\inc\rxsdk_Debugcfg.props" />
<Import Condition="'$(ArxAppType)'=='dbxnet' or '$(ArxAppType)'=='crxnet' or '$(ArxAppType)'=='arxnet'" Project="Autodesk.arx-2020-net.props" />

这三个是调试和最终发布的一些设置,其中出bug那个地方是在true改为false。 原文链接:https://blog.csdn.net/ImummyI/article/details/103980572

clr操作cpp最简单的方式

创建cpp代码

导出需要使用的代码

在cpp中先封装一次

CFuncHelper.h

C++
#pragma once
#ifdef ZWWHFORJTSERIALNOLABEL_MODULE
#define DLLIMPEXP __declspec(dllexport)
#else
#define DLLIMPEXP
#endif
class DLLIMPEXP CFuncHelper
{
public:
    CFuncHelper();
    ~CFuncHelper();

    bool generateNo();
};

CFuncHelper.cpp

C++
#include "stdafx.h"
#include "CFuncHelper.h"
#include "CGenerateSerialNo.h"
#include "CGlobalHelper.h"
#include "CSelCSerialNo.h"
#include "CCoordinateInfoJig.h"


CFuncHelper::CFuncHelper()
{
}


CFuncHelper::~CFuncHelper()
{
}

bool CFuncHelper::generateNo()
{
    CGenerateSerialNo gen;
    if (!gen.doIt())
    {
        return false;
    }
    gen.drawSerialNoByInfo();
    AcGePoint3d basePt = gen.basePt();

    AcDbExtents exts = CGlobalHelper::getFrameExtsbyPoint(basePt);
    CGlobalHelper::ZOOMWINDOW(exts.minPoint(), exts.maxPoint());
    AcGePoint3d minPt, maxPt;
    minPt = CGlobalHelper::TransformPoint(exts.minPoint(), 0, 1);
    maxPt = CGlobalHelper::TransformPoint(exts.maxPoint(), 0, 1);
    exts.set(minPt, maxPt);
    CSelCSerialNo sel;
    sel.setExtents(exts);
    resbuf *rb = acutBuildList(
        -4, _T("<and"), RTDXF0, CBaseConstant::SERIAL_NO, -4, _T("and>"),
        RTNONE); // Simplification for apparent list
    if (!sel.selEnt(rb))
    {
        return false;
    }

    vector<CDimInfo> vecInfo = sel.data();
    if (vecInfo.size() < 1)
    {
        return false;
    }

    CCoordinateInfoJig *jig = new CCoordinateInfoJig();
    jig->startJig(vecInfo);
    return true;
}

创建Clr代码

image-20241202083011439

clrDemo.h

C++
#pragma once
#include "CFuncHelper.h"
using namespace System;

namespace clrDemo {
    public ref class ManageExport
    {
    public:
        ManageExport() : nativeCSelCircleInfo(new CFuncHelper()) {}
        ~ManageExport() { this->!ManageExport(); }
        !ManageExport() { delete nativeCSelCircleInfo; }
        bool Test()
        {
            return nativeCSelCircleInfo->generateNo();
        }

    private:
        CFuncHelper* nativeCSelCircleInfo; // 原生CSelCircleInfo类的实例指针

    };
}

Csharp中引入clr生成的dll

Sublime Text4 4169 安装激活

下载地址

https://download.sublimetext.com/sublime_text_build_4169_x64_setup.exe

激活

默认安装路径:C:\Program Files\Sublime Text

安装之后,使用sublime text 打开安装目录下的sublime_text.exe文件。

Ctrl + F 搜到到

Bash
80 7805 000f
94c1

更改为

Bash
c6 4005 0148
85c9

然后另存到其他路径,然后关闭sublime text,将原sublime_text.exe进行替换即可。

关闭更新

打开Sublime,在最上方菜单栏点击Preferences(中文“首选项”),然后点击(中文“设置-特定语法”)

在花括号中输入以下语句: "ignored_packages": [], "update_check":false, 然后,Ctrl+S保存 注:切记是在英文模式下!!!

image-20240719162525183

打开Sublime,在最上方菜单栏点击Preferences(中文“首选项”),然后点击Settings(中文“设置”)

在花括号中输入以下语句: "update_check":false, 注:切记是在英文模式下!!!

image-20240719162626571

☞ How to install free evaluation for Sublime Text:

Bash
1. Package Control  Install Package  Theme - Monokai Pro
2. Command Palette  Monokai Pro: select theme

ConvertToUTF8

Bash
Package Control  Install Package  ConvertToUTF8

BracketHighlighter

Bash
Package Control  Install Package  BracketHighlighter

Chinese

Bash
Package Control  Install Package  Chinese

使用 XAML 格式化工具:XAML Styler

1. XAML 的问题#

刚入门 WPF/UWP 之类的 XAML 平台,首先会接触到 XAML 这一新事物。初学 XAML 时对它的印象可以归纳为一个词:一坨

随着我在 XAML 平台上工作的时间越来越长,我对 XAML 的了解就越来越深入,从语法、约束、扩展性等方方面面,我明白到 XAML 是桌面开发平台的一个最佳解决方案。这时候我已经对 XAML 有了改观,我重新用一个词归纳了我对它的印象:一大坨

没错,这时候我已经是一个成熟的 XAML 工人了,经过我熟练的双手产生了一坨又一坨 XAML,它们成长相遇结合繁衍,变成了一大坨又一大坨 XAML。

明明 XAML 这么一大坨已经够艰难了,偏偏对于它的格式化微软爸爸也没给个好的方案。对我来说,XAML 格式化主要的难题是下面几个:

  • 如果所有属性都写在同一行,它太宽了很难看到后面的属性
  • 如果每个属性单独一行,它又太长了很难看清楚它的结构
  • 属性之间没有排序,重要属性的属性找起来很困难
  • 团队没有统一的标准,不小心格式化一下代码的话全部都会变,CodeReview 烦死个人

如果不想得过且过忍受上述这些问题的话,可以试试用 XAML Styler 这个工具,它正好解决了我最想解决的问题。

2. 安装 XAML Styler#

XAML Styler 是一个 VisualStudio插件(也可用于其它 IDE),这是它在 Github 上的地址:

https://github.com/Xavalon/XamlStyler

在这里你可以找到具体的文档,而这篇文章我只介绍我关心的其中几个属性,不一定满足到你。

在 VisualStudio 的管理扩展窗口中,输入 XamlStyle 搜索,点击“下载”然后关闭 VisualStudio 即可完成安装。

img

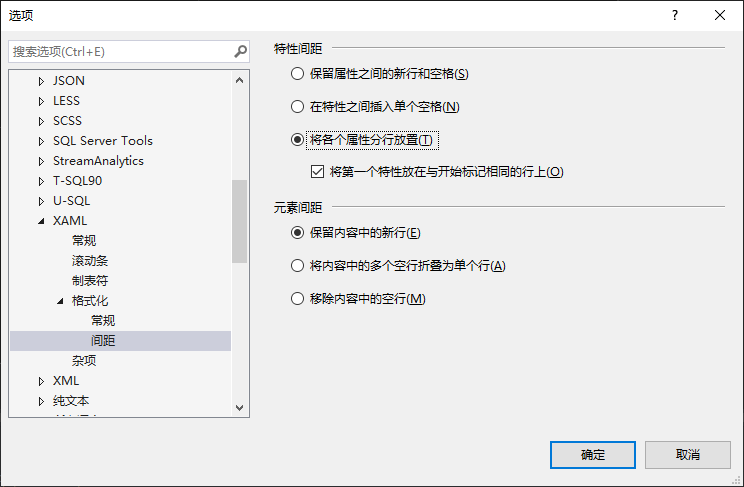
安装完成后重启 Visual Studio,可以在“选项”窗口中看到它的配置:

img

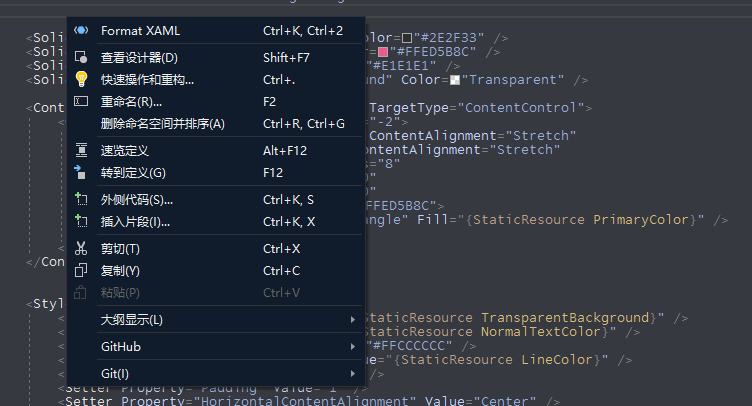
之后,每次在 XAML 编辑器中执行保存都会自动进行格式化操作。你也可以在 XAML 编辑器的右键菜单选择 Format XAML 或使用快捷键进行格式化。

img

3. 格式化#

XAML 的格式主要有两种方式:所有属性放一行和每个属性单独一行。

如果选择所有属性放一行的时候,XAML 结构清晰,结构严谨,段落分明,而且文件也很短。

可是万一很多属性问题就出来了,一行 XAML 会变得很长。而且看看下面两个 ContentPresenter,同样都有 Margin 属性、HorizontalAlignment 属性,VerticalAlignment 属性,RecognizesAccessKey 属性,SnapsToDevicePixels 顺序ing,但你能看到第二个 ContentPresenter 后面偷偷塞了个 Margin 吗:

XML
Copy<ContentPresenter Margin="{TemplateBinding Padding}" HorizontalAlignment="{TemplateBinding HorizontalContentAlignment}" VerticalAlignment="{TemplateBinding VerticalContentAlignment}" RecognizesAccessKey="True" SnapsToDevicePixels="{TemplateBinding SnapsToDevicePixels}"/>
<ContentPresenter Margin="{TemplateBinding Padding}" HorizontalAlignment="{TemplateBinding HorizontalContentAlignment}" VerticalAlignment="{TemplateBinding VerticalContentAlignment}" RecognizesAccessKey="True" SnapsToDevicePixels="{TemplateBinding SnapsToDevicePixels}" Margin="40"/>

如果在 VisualStudio 中“文本编辑器->XAML->格式化->间距->特性间距”这个选项中选择了“将各个属性分别放置”:

img

格式化文档后上面的 XAML 就会变成这样:

XML
Copy<ContentPresenter Margin="{TemplateBinding Padding}"
                  HorizontalAlignment="{TemplateBinding HorizontalContentAlignment}"
                  VerticalAlignment="{TemplateBinding VerticalContentAlignment}"
                  RecognizesAccessKey="True"
                  SnapsToDevicePixels="{TemplateBinding SnapsToDevicePixels}" />
<ContentPresenter Margin="{TemplateBinding Padding}"
                  HorizontalAlignment="{TemplateBinding HorizontalContentAlignment}"
                  VerticalAlignment="{TemplateBinding VerticalContentAlignment}"
                  RecognizesAccessKey="True"
                  SnapsToDevicePixels="{TemplateBinding SnapsToDevicePixels}"
                  Margin="40" />

每个属性单独一行不仅不会看漏属性,而且编辑器本身也不会有横向和纵向两种方向的移动,只有从上到下的移动,这就舒服多了。

可是大部分情况下每个属性分行放置会破坏原本清晰的 XAML 层次结构,例如下面这种本来好好的 XAML:

XML
1
2
3
4
5
6
Copy<Setter Property="FontWeight" Value="Normal" />
<Setter Property="UseSystemFocusVisuals" Value="True" />
<Setter Property="FocusVisualMargin" Value="-3" />
<Setter Property="Height" Value="50" />
<Setter Property="Width" Value="50" />
<Setter Property="Maximum" Value="1" />

变成这样:

XML
Copy<Setter Property="FontWeight"
        Value="Normal" />
<Setter Property="UseSystemFocusVisuals"
        Value="True" />
<Setter Property="FocusVisualMargin"
        Value="-3" />
<Setter Property="Height"
        Value="50" />
<Setter Property="Width"
        Value="50" />
<Setter Property="Maximum"
        Value="1" />

这种风格优雅得像诗歌 我偶尔称为豆瓣风 一行变两行 两行变四行 本来 一页看得完 的代码 变成 两页才看得完 也是够 麻烦的。

XAML Styler 很好地解决了这个问题,它通过 “Attribute tolerance” 属性控制每一行的容许的最多的属性数量,如果一个元素的属性数量少于设定值,那就放在一行,如果超过就所有属性单独一行。通常我将这个属性设置为 2,再配合 “Keep first attribute on same line = true” 的设置,可以做到下面这种格式化效果:

XML
Copy<SolidColorBrush x:Key="NormalTextColor" Color="#2E2F33" />
<SolidColorBrush x:Key="PrimaryColor" Color="#FFED5B8C" />
<SolidColorBrush x:Key="LineColor" Color="#E1E1E1" />
<SolidColorBrush x:Key="TransparentBackground" Color="Transparent" />

<ControlTemplate x:Key="CompletedTemplate" TargetType="ContentControl">
    <Grid x:Name="CompletedElement" Margin="-2">
        <control:DropShadowPanel HorizontalContentAlignment="Stretch"
                                 VerticalContentAlignment="Stretch"
                                 BlurRadius="8"
                                 OffsetX="0"
                                 OffsetY="0"
                                 Color="#FFED5B8C">
            <Ellipse x:Name="CompletedRectangle" Fill="{StaticResource PrimaryColor}" />
        </control:DropShadowPanel>
    </Grid>
</ControlTemplate>

这样就可以兼顾两种格式化的优点。

4. 排序#

如果元素有多个属性,要找到它的主要属性(通常是 Name 和 Grid.Row)需要颇费一番功夫。XAML Styler 根据一个可设定的规则自动将元素的各个属性排序,这个规则如下:

JSON
Copy"AttributeOrderingRuleGroups": [
    "x:Class",
    "xmlns, xmlns:x",
    "xmlns:*",
    "x:Key, Key, x:Name, Name, x:Uid, Uid, Title",
    "Grid.Row, Grid.RowSpan, Grid.Column, Grid.ColumnSpan, Canvas.Left, Canvas.Top, Canvas.Right, Canvas.Bottom",
    "Width, Height, MinWidth, MinHeight, MaxWidth, MaxHeight",
    "Margin, Padding, HorizontalAlignment, VerticalAlignment, HorizontalContentAlignment, VerticalContentAlignment, Panel.ZIndex",
    "*:*, *",
    "PageSource, PageIndex, Offset, Color, TargetName, Property, Value, StartPoint, EndPoint",
    "mc:Ignorable, d:IsDataSource, d:LayoutOverrides, d:IsStaticText",
    "Storyboard.*, From, To, Duration"
],

排序结果大致如下:

XML
1
2
3
4
5
6
7
8
9
Copy<Button x:Name="Show"
        Grid.Row="1"
        Padding="40,20"
        HorizontalAlignment="Center"
        VerticalAlignment="Center"
        Background="#00aef1"
        Content="Show"
        Foreground="White"
        Style="{StaticResource BubbleButtonStyle}" />

另外,我不喜欢它自动将 VisualStateManager 排序到后面,虽然这个排序合理,但不符合我的习惯,所以要将 “Record visual state manager” 设置为 None。

5. 统一标准#

最后,就算自己做好了格式化,团队中的其它成员使用了不同的格式化标准也会引起很多问题。针对这个问题 Xaml Styler 也提供了解决方案。

在项目的根目录创建一个名为“Settings.XamlStyler”的文件,内容参考这个网址:https://github.com/Xavalon/XamlStyler/wiki/External-Configurations 中的 Default Configuration。有了这个配置文件,XAML Styler 就会根据它而不是全局配置进行格式化,作为项目的统一格式化标准。

Csharp使用Newtonsoft.Json生成JSON字符串

下载newtonsoftjson

在“解决方案资源管理器”中,右键单击项目,然后选择“管理NuGet程序包”。在NuGet包管理器中,搜索“Newtonsoft.Json”。找到Newtonsoft.Json包,点击安装按钮

C#
using Newtonsoft.Json;
using Newtonsoft.Json.Linq;

对于复杂json串

  • 对于简单的json的可以直接解析, 复杂的json, 建议用先创建json对应的类,然后再用JsonConvert.DeserializeObject转为类来解析, 当json比较复杂时, 创建类也比较浪费时间, VS2022为C#提供了json转C#类的工具,先复制需要转为类的json字符串,然后将光标定位到cs文件的空白处,最后点击编辑–选择性粘贴–将Json粘贴为类,如下图:

  • 除了VS自带的工具,也有一些网站提供了类似的功能,例如Json2CSharp

### demo

JSON
1
2
3
4
5
6
7
8
9
{
    "items": [{
        "id": "csrf",
        "attributes": {
            "nonce key": "CSRF NONCE",
            "nonce": "i8Ah1n1DHs71704s2oZnSxmiz4/R3T5mbFrkxErz4m8RUDf3kyX+ror25kZ09Env0tGeVBe+iES8/Y04XRfAKvghp1/+ZIx09oVE7GiE"
        }
    }]
}

class

C#
//如果好用,请收藏地址,帮忙分享。
public class Attributes
{
    /// <summary>
    /// 
    /// </summary>
    public string nonce_key { get; set; }
/// <summary>
/// 
/// </summary>
    public string nonce { get; set; }
}

public class ItemsItem
{
    /// <summary>
    /// 
    /// </summary>
    public string id { get; set; }
    /// <summary>
    /// 
    /// </summary>
    public Attributes attributes { get; set; }
}
//Root可以改成自己喜欢的类名
public class CScrfRoot
{
    /// <summary>
    /// 
    /// </summary>
    public List<ItemsItem> items { get; set; }
}

读取json文件

C#
public static string GetDllDirectory()
{
    string codeBase = Assembly.GetExecutingAssembly().CodeBase;
    UriBuilder uri = new UriBuilder(codeBase);
    string path = Uri.UnescapeDataString(uri.Path);
    return System.IO.Path.GetDirectoryName(path);
}
public MyDropMenu()
{
    System.Uri resourceLocater = new System.Uri("/MyDropMenu;component/ComUseicons.xaml", System.UriKind.Relative);
    ResourceDictionary rd = (ResourceDictionary)Application.LoadComponent(resourceLocater);
    Application.Current.Resources.MergedDictionaries.Add(rd);

    InitializeComponent();
    try
    {
        string jsonFile = GetDllDirectory() + "\\Menu.json";
        // 确保文件存在
        if (!File.Exists(jsonFile))
            throw new FileNotFoundException("The JSON file was not found." + jsonFile);

        // 读取文件内容并反序列化为指定的类型 T
        var reader = new StreamReader(jsonFile);
        var json = reader.ReadToEnd();
        var person = JsonConvert.DeserializeObject<Root>(json);
        Items = person.ItemMenu;
        //遍历items,将icon添加数据
        // 遍历并修改Icon
        foreach (var itemMenu in Items)
        {
            itemMenu.Icon = GetDllDirectory() + "\\config\\Images\\PNG\\" + itemMenu.Icon;
            foreach (var subItem in itemMenu.SubItems)
            {
                subItem.Icon = GetDllDirectory() + "\\config\\Images\\PNG\\" + subItem.Icon;
            }
        }
        LeftMenu.ItemsSource = Items;
    }
    catch (Exception)
    {
        throw;
    }
}

获取token(nonce)值

C#
 public static string getTokenFromJson(string strJson)
        {
            string strRet = "";
            //strJson = "{\"items\":[{\"id\":\"csrf\",\"attributes\":{\"nonce key\":\"CSRF NONCE\",\"nonce\":\"i8Ah1n1DHs71704s2oZnSxmiz4/R3T5mbFrkxErz4m8RUDf3kyX+ror25kZ09Env0tGeVBe+iES8/Y04XRfAKvghp1/+ZIx09oVE7GiE\"}}]}";
            var person = JsonConvert.DeserializeObject<CScrfRoot>(strJson);
            List<ItemsItem> listItems = person.items;
            if(listItems.Count >= 1)
            {
                ItemsItem itemsItem = listItems[0];
                Attributes attr = itemsItem.attributes;
                strRet = attr.nonce;
            }

            return strRet;
        }

LINQ to JSON主要使用到JObject, JArray, JProperty和JValue这四个对象

  • JObject用来生成一个JSON对象,简单来说就是生成”{}”,
  • JArray用来生成一个JSON数组,也就是”[]”,
  • JProperty用来生成一个JSON数据,格式为key/value的值,
  • 而JValue则直接生成一个JSON值
C#
//将json转换为JObject
JObject jObj = new JObject();
jObj.Add("process0id", AdditionClass.GetDeFaultProjectNo());


PdfRow pdfRow1 = new PdfRow();
pdfRow1.status = "success";
pdfRow1.pdfname = "D:\\ZWPDF\\PDF\\JG-72-BL-LB1.pdf";


PdfRow pdfRow2 = new PdfRow();
pdfRow2.status = "error";
pdfRow2.pdfname = "D:\\ZWPDF\\PDF\\JG-72-BL-LB2.pdf";


List<PdfRow> videogames = new List<PdfRow>();
videogames.Add(pdfRow1);
videogames.Add(pdfRow2);

JArray jArray = (JArray)JsonConvert.DeserializeObject(JsonConvert.SerializeObject(videogames));
jObj.Add("message", "转换完成");
jObj.Add("rowPdf", jArray);
Console.WriteLine(jObj.ToString());
JSON
{
  "process0id": "05369",
  "message": "转换完成",
  "rowPdf": [
    {
      "status": "error",
      "pdfname": "D:\\TEST\\ZP-35-DYT-35N3--竖向图框.dwg"
    },
    {
      "status": "error",
      "pdfname": "D:\\TEST\\图框外有多余线条.dwg"
    },
    {
      "status": "error",
      "pdfname": "D:\\TEST\\弧线标注的圆心在图框外1.dwg"
    }
  ]
}